Android Authenticator
对用Android的Authenticator,官方的API Guides是似乎没有很好的介绍文档,Reference中也只是简单地介绍了一下。虽然sync-adapters中对于Authenticator有提及,但是对于其用法也没有一个完整的认识,所以对其进行一定的学习并且记录了下来。
为什么需要Account Manager
我们完全可以自己自己的账户管理机制,提交一个登录表单到服务器然后返回一个认证token。但是通常覆盖不到一些细节,如果用户在另外一客户端修改了密码怎么办;认证token的过期处理;单点登录的实现。这些东西实现起来还是挺麻烦的,但是如果Android的认证框架已经实现了这些功能,并且额外提供了用户数据同步等额外的功能,那还有理由不使用它吗?Stop Trying to Reinvent the Wheel.
实现类
Account相关的类都位于android.accounts包下,以下是其中几个主要的类。
AccountManager
提供访问所有用户账户的注册中心。 不同的在线服务有不同的处理账户和认证的方式,所以AccountManager对不同的account types使用可插拔的authenticator的模块,由第三方提供的Authenticators处理实际的账户认证细节。AccountManager还可以为应用生成
auth token,所以应用不必直接处理密码。Auth tokens通常被AccountManager缓存并重复利用。AccountAuthenticator
上面提到的可插拔的authenticator模块,处理特定的account types。AccountManager通过查找到合适的AccountAuthenticator,与其进行通信来实现对特定的account types的所有操作。AccountAuthenticatorActivity
当需要验证用户的时候,由authenticator调用,来进行“登录/创建 account”的Activity的基类。
调用流程
以添加账户为例
关键代码
|
|
|
|
|
|
|
|
|
|
时序图如下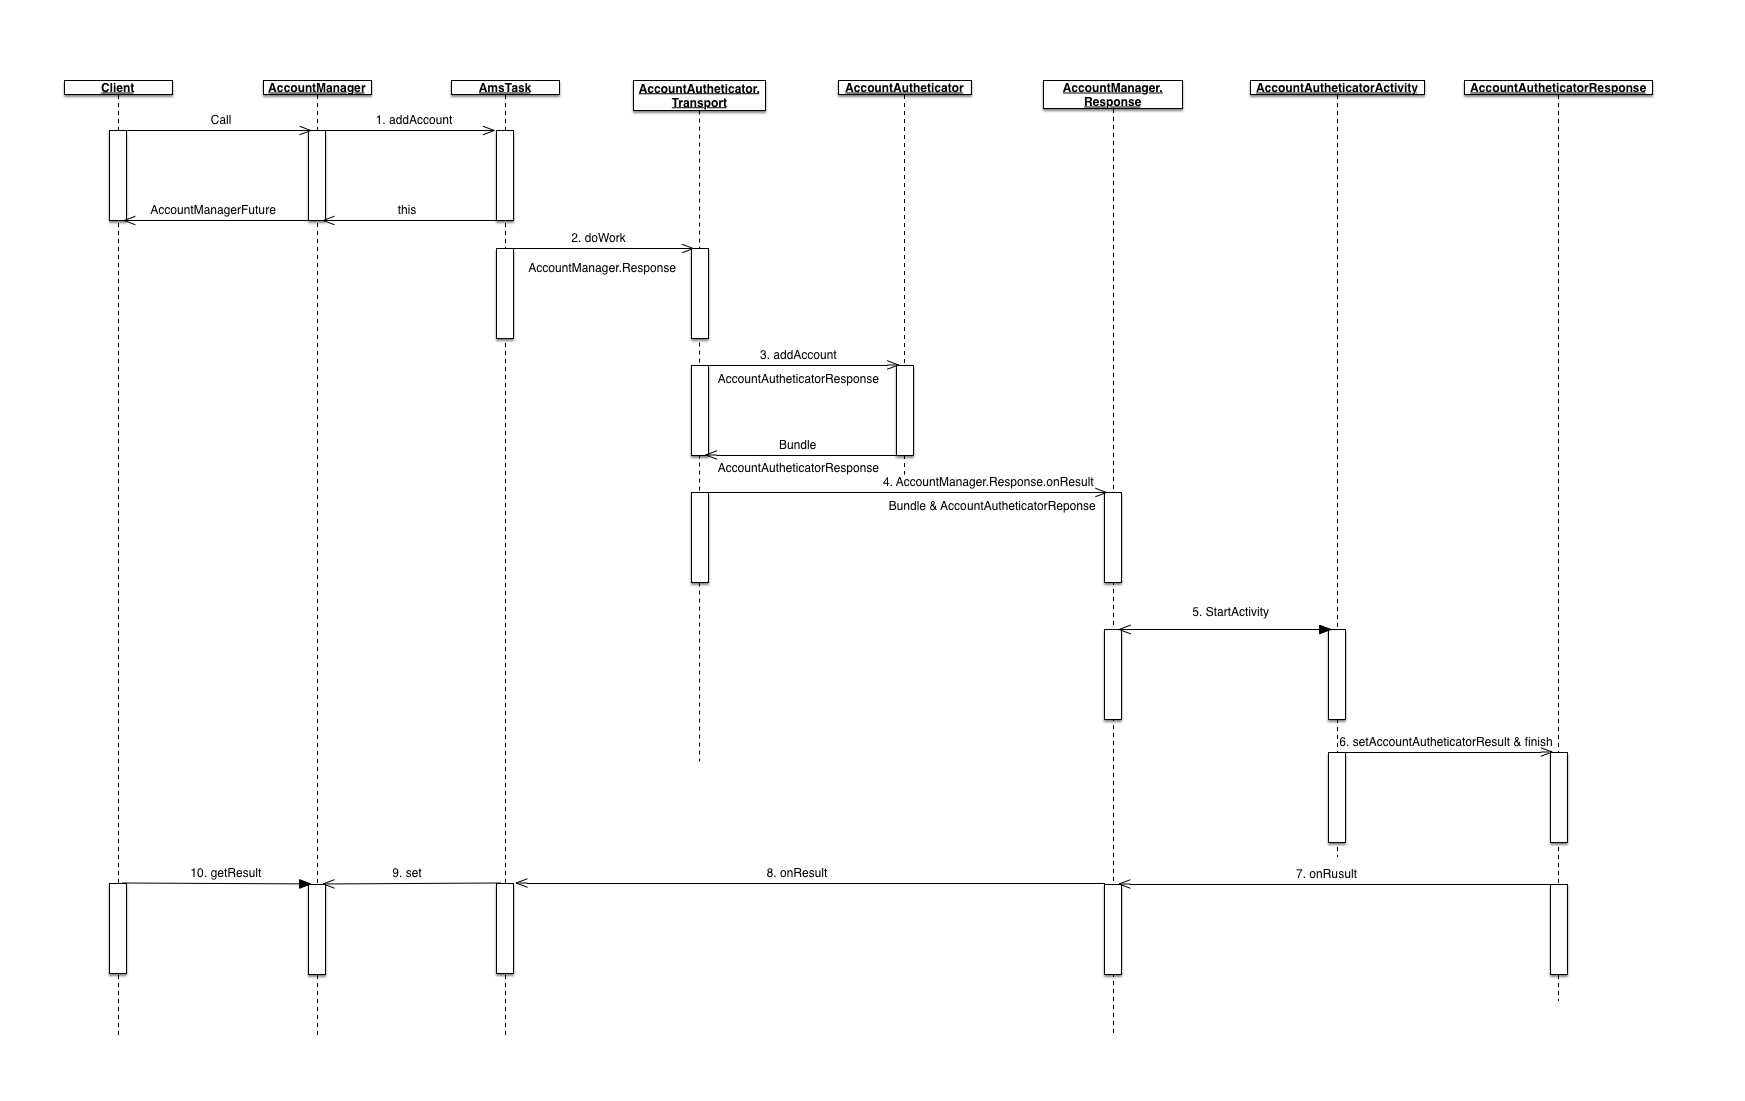
- 客户端调用
AccountManager#addAccount方法添加账户。 AccountManager#addAccount方法中会调用AmsTask#start并返回结果,AmsTask#start的主要内容是调用doWork方法。AmsTask#doWork方法以AIDL方式调用AbstractAccountAuthenticator#addAccount方法。AbstractAccountAuthenticator#addAccount方法需要用户实现其逻辑。实现逻辑中需要告诉框架到哪个Activity进行具体的账户添加动作,因此需要返回一个Bundle包含以AccountManager.KEY_INTENT为key的Intent,Intent中需包含以AccountManager.KEY_ACCOUNT_AUTHENTICATOR_RESPONSE为key的AccountAuthenticatorResponse。AccountManager#addAccount方法中后记调用AmsTask#Response#onResult方法AmsTask#Response#onResult逻辑中会判断AbstractAccountAuthenticator#addAccount返回的Bundle中后否包含AccountManager.KEY_INTENT,如果包含则启动对应的Activity,所以#3中的实现方法必须设置AccountManager.KEY_INTENT。- 跳转的Activity需要继承
AccountAuthenticatorActivity,该类的实现逻辑中可以调用AccountManager#addAccountExplicitly添加账户,AccountManager#setPassword更新密码,AccountManager#setAuthToken设置token等等。最终需要调用AccountAuthenticatorActivity#setAccountAuthenticatorResult方法设置返回结果并调用AccountAuthenticatorActivity#finish结束当前的Activity AccountAuthenticatorActivity#finish方法会调用AccountAuthenticatorResponse#onResult并传递上部设置的返回结果。此处的AccountAuthenticatorResponse对象正式之前#3设置的AccountManager.KEY_ACCOUNT_AUTHENTICATOR_RESPONSE。AccountAuthenticatorActivity会在初始化的时候自动获取protected void onCreate(Bundle icicle) { super.onCreate(icicle); mAccountAuthenticatorResponse = getIntent().getParcelableExtra(AccountManager.KEY_ACCOUNT_AUTHENTICATOR_RESPONSE); if (mAccountAuthenticatorResponse != null) { mAccountAuthenticatorResponse.onRequestContinued(); } }AccountAuthenticatorResponse是之前AmsTask#Response的包装类,其onResult实现会调用AmsTask#Response#onResult方法- 由于这次Activity返回的Bundle并没有包含
AccountManager.KEY_INTENT,所以会调用AmsTask#set方法 - 客户端在#1调用了
AccountManager#addAccount会返回实现了AccountManagerFuture接口的AmsTask对象,调用getResult方法可以获取结果,但是线程会阻塞轮询,直至#9完成为止。
当然并不是所有的Account操作都需要启动Activiy进行辅助的。有些逻辑可以直接在AbstractAccountAuthenticator子类方法中直接完成,然后返回一个结果。这些实现类的返回结果方式都是通过Bundle中设置AccountManager中定义的特殊Key来是实现的,例如KEY_ACCOUNTS,KEY_BOOLEAN_RESULT等等。这些方法不启动的Activiy,所以AccountManager的实现中是调用的Future2Task而不是AmsTask。
实现
Authenticator
Authenticator需要继承AbstractAccountAuthenticator。
###其中几个主要的方法
addAccount
添加账号,需要返回Intent跳转到AccountAuthenticatorActivity进行实际的登录confirmCredentials
确认账号信息,也需要Activity的辅助,可以在一些账户切换的场合使用updateCredentials
更新账号信息,也需要Activity的辅助,可以在密码变更,token失效的时候调用getAuthToken
获取用户token,实现逻辑可以参考官方文档对AccountManager#getAuthToken的描述:如果之前已经生成了token并缓存,可以通过AccountManager#peekAuthToken返回之前缓存的token,否则,如果通过AccountManager#getPassword能够获取的用户密码,则直接申请token,否则,跳转到登陆页面。
getAuthToken有三个重载方法:public AccountManagerFuture<Bundle> getAuthToken (Account account, String authTokenType, Bundle options, Activity activity, AccountManagerCallback<Bundle> callback, Handler handler)这个方法适用于应用在前台运行时调用,必要的情况下,会弹出请求用户输入证书
public AccountManagerFuture<Bundle> getAuthToken (Account account, String authTokenType, boolean notifyAuthFailure, AccountManagerCallback<Bundle> callback, Handler handler)API level 14已经废弃,使用下面的方法
public AccountManagerFuture<Bundle> getAuthToken (Account account, String authTokenType, Bundle options, boolean notifyAuthFailure, AccountManagerCallback<Bundle> callback, Handler handler)这个方法适用于应用在后台运行时调用,如果需要用户输入证书,可以发出一个通知(notification)。如果
notifyAuthFailure设置为true,需要的情况下会发出一个会启动对应Intent的通知;如果设置为false,那么是由应用来处理返回的Intent。
一些上述方法中使用到的参数:
- accountType
用于标示账户的类型,通常一种类型绑定到一个AccountAuthenticator。可以多个app使用同一个accountType实现单点登陆。 - authTokenType
用于标示authToken的类型,同一账户在不同的app中获取的authToken可能拥有不同的scope,从而可以用authTokenType来标示该authToken的类型。
AccountAuthenticatorService
Authenticator的实现类最后会由AccountManager以AIDL的方式调用。所以实现需要注册响应的Service。AbstractAccountAuthenticator已经已经实现了getIBinder方法,所以只需在onBind调用该方法即可。
同时还需要在Manifest中注册:
其中meta-data引用的resource决定显示在Setting & Account中的内容
android:icon,android:label,android:smallIcon决定在Account中的显示
android:accountType是传入AccountAuthorization#addAccount的值
android:accountPreferences可以定义Setting & Account中偏好界面,从而对账户进行一些偏好设置
