基于Grunt的前端项目的完整构建
本文主要简述一个前端项目使用grunt来进行构建的过程。项目本身是基于RequireJS的,样式则使用了Less来书写。
项目结构
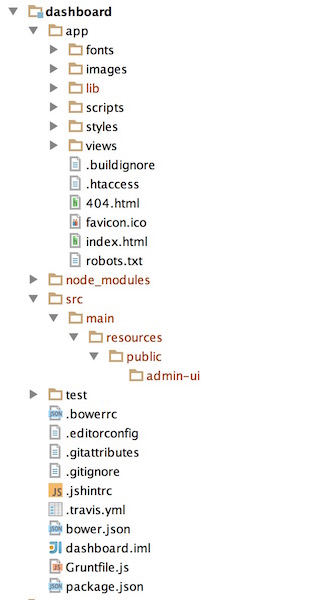
先来看一下项目整体的目录结构。
Gruntfile
通常我们需要grunt分别在开发,以及部署时为我们进行构建。
运行时构建
运行时构建需要的步骤如下,
|
|
- 清理上次的构建
- 安装bower的依赖,这里安装到app的lib目录,以便
RequrieJS进行引用 编译
styles目录下的main.less文件less: { dist: { files: { '<%= yeoman.app %>/styles/main.css': ['<%= yeoman.app %>/styles/main.less'] }, options: { sourceMap: true, sourceMapFilename: '<%= yeoman.app %>/styles/main.css.map', sourceMapBasepath: '<%= yeoman.app %>/', sourceMapRootpath: '/' } } },复制
styles目录下的css文件到.tmp目录。这里的concurrent:server只是并行的执行了copy:styles任务。styles: { expand: true, cwd: '<%= yeoman.app %>/styles', dest: '.tmp/styles/', src: '{,*/}*.css' }configureProxies是grunt-connect-proxy的任务, 由于开发阶段,前端项目是运行在node的服务器中,JS脚本和后台服务器并不在一个服务器,所以涉及脚本跨域问题,所以在开发阶段,需要配置一个代理服务器。autoprefixer用来解析.tmp目录下的CSS文件并且添加浏览器前缀到CSS规则里,处理后输出回styles目录。配置grunt-contrib-connect,支持livereload。这里需要配置两个地方:
grunt-contrib-connect的livereload选项Type: Boolean or Number
Default: falseSet to true or a port number to inject a live reload script tag into your page using connect-livereload.
This does not perform live reloading. It is intended to be used in tandem with grunt-contrib-watch or another task that will trigger a live reload server upon files changing.
grunt-contrib-connect的middleware选项
middleware支持livereload,可以通过connect-livereload或者grunt-connect-proxy
因为之前已经使用了
grunt-connect-proxy,这里还是使用grunt-connect-proxylivereload: { options: { open: true, base: [ '.tmp', '<%= yeoman.app %>' ], middleware: function (connect, options) { if (!Array.isArray(options.base)) { options.base = [options.base]; } var middlewares = [require('grunt-connect-proxy/lib/utils').proxyRequest]; options.base.forEach(function (base) { grunt.log.warn(base); middlewares.push(connect.static(base)); }) return middlewares; } } }- 配置watch,当文件有变化时进行reload
部署时构建
相较于运行时的构建,部署构建最主要的差别在于需要对资源文件进行合并,压缩等优化工作。
|
|
clean:dist和运行时构建类似,清理上一次的build构建。jshint对js文件进行语法检查bower:install同运行时构建less同运行时构建copy:styles同运行时构建autoprefixer同运行时构建useminPrepare任务更新gruntfile来设置一个配置好的转换流程。默认的对JS转换流程是concat以及uglifly。这个task需要需要Blocks来生成对应的grunt task。Blokcs的配置请参考BlocksuseminPrepare: { html: '<%= yeoman.app %>/index.html', options: { dest: '<%= yeoman.dist %>', flow: { html: { steps: { js: ['concat', 'uglifyjs'], css: ['cssmin'] }, post: {} } } } },concat是由useminPrepare生成的task,进行js文件的合并。cssmin也是由useminPrepare生成的task,进行css文件的压缩。copy:dist任务拷贝所有的资源到的最终需要部署的web项目的public目录中。
dist: {
},files: [{ expand: true, dot: true, cwd: '<%= yeoman.app %>', dest: '<%= yeoman.dist %>', src: [ '*.{ico,png,txt}', '.htaccess', '*.html', 'views/{,*/}*.html', 'images/{,*/}*.{webp}', 'fonts/*', 'lib/**/*' ] }, { expand: true, cwd: '.tmp/images', dest: '<%= yeoman.dist %>/images', src: ['generated/*'] }, { expand: true, cwd: 'bower_components/bootstrap/dist', src: 'fonts/*', dest: '<%= yeoman.dist %>' }]filerev根据文件的内容生成修订版本号,用于文件缓存。usemin执行两个步骤,替换源文件的资源引用为最终修订的文件。First it replaces all the blocks with a single “summary” line, pointing to a file creating by the transformation flow.
Then it looks for references to assets (i.e. images, scripts, …), and tries to replace them with their revved version if it can find one on diskhtmlmin进行最终的对HTML进行压缩
完整示例请参考
